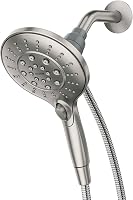
How to Install a Dual Shower Head
Here's how to install a dual shower head: fit the arm and dock the hand shower first, then attach the hose and check the diverter before you run water. Most dual heads hang on the existing shower arm, so the work is sealing threads and testing joints, not changing plumbing.
On this page (11 sections)
- How to install a dual shower head in five steps
- What tools and parts do you need before you start?
- How do you remove the old shower head without damage?
- How do you seal and fit the new head?
- How do you connect the hand shower hose?
- How do you set the diverter for one spray or both?
- How do you test the install for leaks?
- Which dual head should you fit, and when do you need a kit?
- What changes when the kit includes a new valve?
- How do you keep a dual head working well?
- What should you do before you buy a dual head?
Here's how to install a dual shower head: fit the arm and dock the hand shower first, then attach the hose and check the diverter before you run water. Most dual heads hang on the existing shower arm, so the work is sealing threads and testing joints, not changing plumbing.
The job suits a weekend afternoon. The tools are small and the only part that needs care is the water seal.
If you're upgrading a tired head, this is a quick way to add a second spray without opening the wall.
How to install a dual shower head in five steps
Remove the old head, tape the arm threads, fit the new head and dock, connect the hose, and test. That order keeps water where you want it and gives you a clean check at each joint.
- Turn off the shower and wrap a cloth around the old head in case water sits in the arm.
- Unscrew the old head by hand or with a strap wrench; never use pliers on a chrome finish.
- Clean old tape from the arm threads and wrap two to three turns of PTFE tape clockwise.
- Screw on the dual head or its mount and hand tighten it so the spray faces down.
- Attach the hose to the hand shower and the outlet, then run water and check each joint.
Keep a towel under the arm while you work.
What tools and parts do you need before you start?
You need PTFE tape, an adjustable wrench or strap wrench, a cloth, and a bucket or towel. Add a small brush or toothbrush for cleaning old tape out of the threads.
Check the box for the head, the hand shower, the hose, and the dock or holder. A two-in-one design ships as one unit with the hand piece held in the main head.
A kit with its own arm and valve comes with more parts and needs the wall opened.
Read the maker's sheet for the connection size and any gasket. Most heads use a standard half-inch thread and a rubber washer at the hose end.
Keep the washer in place; tape alone won't seal a hose fitting that needs one.
How do you remove the old shower head without damage?
Turn the head counterclockwise by hand first. A cloth in your grip protects the finish.
If it won't move, a strap wrench around the head gives more grip than pliers.
Don't twist hard on the arm itself. The arm is screwed into a fitting inside the wall, and too much force can loosen it and cause a leak behind the tile.
Hold the arm steady with one hand while the other turns the head.
Once it's off, look at the arm end. Black or white tape packed into the threads needs to come out so the new head seats fully.
A clogged screen or mineral crust at the arm end is worth cleaning before you fit anything new.
How do you seal and fit the new head?
Wrap PTFE tape clockwise around the arm threads, then hand tighten the new head. Clockwise matters: the head turns the same way going on, so the tape tightens instead of peeling back.
Screw the head on until it is snug and the spray faces down. If it stops at an odd angle, don't force it further.
Add a turn of tape and try again, or use a thin washer if the maker allows one.
For a head with a separate hand shower dock, fit the dock to the arm first and then slide the hand piece into it. The Delta In2ition 2-in-1 design docks the hand shower in the main head and lets you use it separately or both sprays at once.
The head runs at 1.75 GPM with Touch-Clean spray holes, so you wipe off mineral buildup with a finger. Its 6 settings cover a full body spray, massage, shampoo rinse, shampoo with massage, a ProClean spray for tile, and pause.
How do you connect the hand shower hose?
Screw the hose onto the hand shower first, then onto the outlet on the head or valve. A rubber washer belongs at each end if the fittings call for one.
Hand tighten both ends. A wrench on a plastic hose nut can crack it.
Once both ends are on, check the hose for kinks; a twist in the hose pulls the hand piece out of its dock.
Run water through the hand shower alone before you dock it. If the spray is uneven, the screen in the hand piece may be clogged or the hose may be twisted.
How do you set the diverter for one spray or both?
Turn the diverter to the spray you want, then run the water to confirm the switch works. Most two-in-one heads use a lever or a turn on the head itself; a kit with a valve uses a separate handle.
Test each position in turn. A four-way diverter might offer the main head, the hand shower, both, or a pause.
Confirm the pause fully stops the flow so you can step away without water running.
If the switch feels stiff or the flow doesn't change, the diverter may be partly turned. Work it through its full travel a couple of times.
A stuck diverter on a new head is often just shipping grease; if it stays stuck, contact the maker rather than forcing it.
How do you test the install for leaks?
Run water at normal pressure and check the arm joint, the head, and both hose ends. Dry each joint with a towel first so any new drip shows clearly.
Watch the arm joint for a minute. A slow bead means the head needs another small turn or more tape.
Check the hose ends next, then the diverter with each spray running.
If water sprays sideways from the head rim, the head is cross-threaded or the washer is missing. Take it off, clean the threads, and refit it straight.
Don't overtighten to stop a leak; that can split a plastic fitting and make it worse.
Which dual head should you fit, and when do you need a kit?
Pick a head that docks on your existing arm for the easiest install. A full system kit is the better call when you want a rain head and a new valve in one job, but it needs the wall opened and the rough-in set.
The Delta In2ition fits the simple path. The HammerHead kit is the complete path.
Its metal rain system includes the valve and trim, a 10 inch rain head, a 3-spray hand shower, a 16 inch overhead arm, and a 72 inch metal hose. The two-handle valve has an integrated diverter to switch between the rain head and the hand shower.
If your shower also has a tub, the Delta Arvo 14 Series set adds an In2ition hand shower to a tub and shower valve, with a pressure-balanced cartridge to hold the temperature steady. That's a bigger job than a head swap.
Our guide to shower heads with a handheld covers the fit choices in more detail. If you want a rain head and a hand shower in one package, compare the best rain shower head with handheld options before you buy.
What changes when the kit includes a new valve?
A kit with a valve needs the wall opened, the rough-in set, and the trim fitted after the tile. That is a different job from swapping a head, and it's the point where most people call a plumber.
The valve body sits behind the wall and connects to the hot and cold supply lines. Measure the rough-in depth before closing the wall, because a valve set too deep or too shallow won't line up with the trim.
How do you keep a dual head working well?
Wipe the spray face after each use and check the hose for kinks once a month. Mineral buildup is the main reason a dual head starts to spray unevenly.
Touch-Clean holes let you rub off calcium and lime with a finger. A 1.75 GPM head set is designed around its flow restrictor, so leave it in place.
If pressure drops, check the inlet screen and the diverter before blaming the head.
For the bigger picture on replacement timing, see how long do shower heads last.
What should you do before you buy a dual head?
Measure the arm and check the connection, then choose a two-in-one head or a full kit. A standard half-inch arm takes most heads.
A kit with its own arm needs the wall to suit its overhead mount.
Check the flow rate against your water supply. A 1.75 GPM head uses less water than a 2.5 GPM model and still feels strong.
If your shower shares water with other fixtures, expect less pressure when both sprays run.
Decide whether you want the hand shower to dock in the head or sit on its own holder. A docked design keeps the stall tidy and fits the arm you already have.
A separate holder gives more reach and a spot to hang the hand piece near the tub.
Tape the threads, fit the head and dock, connect the hose, set the diverter, and test each joint before the first real shower. If you are weighing a rain head and a hand shower together, the best dual shower head system with handheld picks cover both paths.
Frequently asked questions
Do I need a plumber to install a dual shower head?
No, if the new head replaces one on the same arm and the diverter is built into the head or hand shower. A complete system with a new valve and trim involves opening the wall, so that part calls for a plumber unless you have done rough-in work before.
How long does a dual shower head install take?
A head that hangs on the existing arm takes about 15 to 30 minutes, mostly cleaning threads and checking for leaks. A kit with a new valve and trim takes much longer because the wall has to be opened and the rough-in set before the trim goes on.
What tape should I use on the shower arm threads?
Use two to three wraps of PTFE plumber's tape on the arm threads, wound clockwise so it stays put as you turn the head on. Hand tighten first; a strap wrench on the head only if the joint weeps.
Avoid overtightening plastic threads.
Why does my dual shower head lose pressure when both sprays run?
Both sprays split the same water supply, so each gets less flow than a single head. That is normal for a two-in-one design.
If the drop feels extreme, check the flow rate and look for debris or a flow restrictor in the shower arm or head inlet.
Can I put a dual shower head on any shower arm?
Yes for most heads with a standard half-inch connection, since they screw onto the arm the same way as a single head. A kit with its own overhead arm and valve needs the arm mounted and the valve plumbed, so the wall has to suit that layout.
Should I remove the flow restrictor from a new shower head?
No. A 1.75 GPM head is designed around its restrictor to meet water-use rules.
Removing it can raise flow past what the head and valve are set for.
If pressure is low, check for debris at the inlet and the diverter first.