How to Replace a Shower Trim Kit Without a New Valve
You can replace a shower trim kit without changing the valve only if the new trim is compatible with the valve already in the wall. Identify the valve brand and model first, then follow the trim maker's installation instructions.
On this page (8 sections)
- Can you replace a shower trim kit without a new valve?
- What should you check before buying replacement trim?
- What tools and preparation do you need?
- How do you replace shower trim step by step?
- When should you replace the valve too?
- Which replacement kits fit different shower refresh needs?
- What should you check after replacing the trim?
- How do you choose the right way to replace a shower trim kit?
You can replace a shower trim kit without changing the valve when the new trim is compatible with the valve already in the wall. Identify the valve brand and model before buying, shut off the water, and follow the trim maker's instructions.
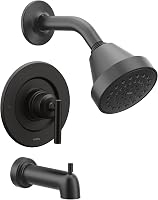
A trim kit usually includes visible parts such as a handle, plate, showerhead, or tub spout. The valve is the plumbing body behind the wall, so changing the visible parts does not automatically mean the valve needs replacement.
Can you replace a shower trim kit without a new valve?
Yes, if the replacement trim fits your existing valve and that valve is in working condition. Trim parts are designed around particular valve systems, so the brand and model matter.
Start by checking paperwork from the installation or any markings on accessible parts. A handle or plate may give you a brand clue, but it may not identify the valve model well enough to confirm compatibility.
If you cannot identify the valve, take clear photos of the handle, plate, and any visible markings to a plumbing supplier or ask a plumber to identify it. Avoid buying based only on finish, handle shape, or a similar-looking product photo.
For a closer look at compatibility, read are shower trim kits universal?. If you need help identifying the valve system, see what shower valve do I need?.
What should you check before buying replacement trim?
Match the trim to the valve model, then check what the kit includes and whether it requires a valve. These checks help prevent buying a set that cannot attach to the plumbing behind the wall.
Look for the valve maker and model in installation records, product documents, or accessible labels. Confirm compatibility with the trim maker's instructions or a qualified plumbing professional.
Next, compare the parts you need. A tub-and-shower trim kit may include a showerhead, handle, tub spout, or plate, while another set may not cover every part of your setup.
Check the valve requirement carefully. Some trim kits require a particular valve to complete installation, while a complete system may include a valve.
The Moen Genta LX, for example, requires Moen Posi-Temp valve 2510. The Moen Engage Magnetix tub and shower trim kit includes a Moen Posi-Temp valve, unless you are replacing trim on an existing compatible Moen Posi-Temp valve.
What tools and preparation do you need?
Gather the tools named in the installation instructions and protect the tub or shower floor before starting. The exact tools vary by trim kit and the parts you are replacing.
Read the instructions from start to finish first. Common household tools may include a screwdriver and adjustable wrench, but don't assume a tool or method is right for every valve.
Lay a towel over the tub or shower floor to protect the surface and catch small parts. Keep a small container nearby for screws and other pieces.
Locate the water shutoff that serves the shower or the home. If you cannot shut off the water safely, pause and contact a plumber.
How do you replace shower trim step by step?
Shut off the water, remove the old visible parts, and install the compatible replacement trim according to its instructions. Keep the valve body in place unless inspection shows a reason to replace it.
- Shut off the water. Use the appropriate shutoff and open the shower control to relieve pressure. Confirm water has stopped before removing parts.
- Protect the bathing surface. Cover the tub or floor and set aside a container for screws.
- Remove the handle and plate. Follow the instructions for the old trim, taking care not to damage the wall or valve.
- Inspect what is visible. Stop if you see active leaking, heavy corrosion, or a loose valve body.
- Fit the new trim. Use only the parts and steps specified for the compatible valve and replacement kit.
- Restore water and check the result. Look for leaks and confirm the handle operates as the instructions describe.
Don't force stuck screws or parts. If you cannot remove the trim without twisting the valve or damaging the wall, stop and call a plumber.
How do you remove the old shower handle and plate?
Remove the handle and plate using the fasteners and method described in the trim instructions. Some screws may be hidden by a cap, but the removal method can differ by design.
Set each piece aside in order so you can tell what came off and where. Avoid prying against tile or pulling hard on parts that seem stuck.
Once the plate is off, look at the exposed area without disturbing plumbing connections. If water is present where it should not be, or the valve shifts when touched, stop the job.
How do you install the new trim?
Install the replacement pieces in the order shown in the instructions, using parts made for the existing valve. Do not substitute screws, adapters, or seals unless the maker specifies them.
Align the plate and handle as instructed, and avoid overtightening. If parts do not line up or the handle does not engage correctly, recheck compatibility rather than forcing a fit.
A new trim kit can refresh the visible finish while leaving the valve in place. For example, {{product B07N1JRSPX | This brushed nickel trim set requires a Moen Posi-Temp valve 2510, so it may suit a matching existing valve.}}
When should you replace the valve too?
Replace the valve only when it is faulty or when the trim you need cannot be matched to it. A trim-only job is not a fix for a leaking or damaged valve.
Signs to stop and get professional help include:
- Water leaking from behind the plate or into the wall
- A valve body that moves when the handle is operated
- Visible corrosion or damage
- A handle that will not engage correctly with compatible trim
- No way to identify the valve or confirm a safe match
Replacing a valve involves plumbing connections behind the wall, which may require access through the shower wall or from another side. If that work is needed, ask a plumber to assess the access and repair.
A trim-to-valve mismatch can also cause installation problems. Learn how the parts differ in shower valve vs diverter: what each part does.
Which replacement kits fit different shower refresh needs?
Choose a trim kit based on your valve compatibility and which visible parts you want to change. The three options below cover different finishes and kit contents, but each requires a compatibility check.
The Engage Magnetix set may fit a larger refresh where you want to replace more than the visible handle and plate. If your existing valve is a compatible Moen Posi-Temp model, the kit's valve requirement may be different from a trim-only kit; confirm the installation instructions before starting.
The Gibson set suits a finish change when your existing valve matches the required Moen 2510. It uses Moen's M-PACT common valve system, which allows future faucet-style updates without replacing plumbing, according to Moen.
For a broader look at systems that include a valve, see best shower faucet sets that include the valve. If you're considering a different valve type, read pressure balance vs thermostatic valve: which fits you?.
What should you check after replacing the trim?
Check for leaks and smooth handle operation after restoring water. Follow the trim maker's instructions for any final adjustments or checks.
Run the shower and inspect around the handle plate and tub spout. If water appears behind the plate, the handle binds, or the control does not work as expected, shut off the water and get professional help.
Don't seal gaps or make adjustments beyond the installation instructions to hide a problem. A concealed leak can cause damage before it becomes easy to spot.
How do you choose the right way to replace a shower trim kit?
For how to replace a shower trim kit, first identify the existing valve, then choose compatible trim and follow its installation steps. Keep the valve if it is sound and the trim matches; call a plumber if the valve leaks, moves, or cannot be identified.
Choose the Moen Genta LX or Gibson only if your valve matches the stated requirement. Consider the Engage Magnetix set if you want a valve included or have a compatible existing Moen Posi-Temp valve.
For the next step, review what shower valve you need and whether shower trim kits are universal before buying.
Frequently asked questions
Can you replace shower trim without replacing the valve?
Yes, if the replacement trim is made for the valve already installed and the valve is in sound condition. Confirm the valve brand, model, and trim compatibility before buying.
If you can't identify the valve or find compatible trim, ask a plumber to inspect it before opening the wall.
Are shower trim kits universal?
No. Trim kits are not universally interchangeable because handles, plates, and other parts must fit the valve behind the wall.
Match the trim to the valve maker and model, and check whether the kit requires a specific valve.
See our guide to whether shower trim kits are universal for details.
Do you have to turn off water to replace shower trim?
Usually, you should shut off the water supply before removing shower trim, then open the shower control to relieve pressure. If there is no accessible shutoff, or you are unsure how to isolate the shower safely, contact a plumber instead of removing parts.
When should a plumber replace the shower valve?
Call a plumber if the valve leaks, is badly corroded, moves in the wall, or cannot be matched to compatible trim. A trim swap should not require cutting into the wall, but replacing the valve may involve plumbing work and access behind the shower.